Oracle does publish a standalone MySQL Installer designed to ease the complexity of installing and configuring MySQL products that run on Microsoft Windows. Here’s the link for the installer:
- https://dev.mysql.com/downloads/installer/
- https://dev.mysql.com/doc/mysql-installation-excerpt/8.0/en/mysql-installer.html
- https://downloads.mysql.com/docs/mysql-installer-en.pdf
This article explains the steps to manually install MySQL without using the Installer.
Why do this manually?
- You can install multiple instance of the same version of MySQL
- Deeper understanding and insights of how MySQL configuration works.
- Better control and more flexible in the configuring MySQL
Official MySQL Installation Guide: https://dev.mysql.com/doc/refman/8.0/en/installing.html
Here is a quick simplified summarized installation steps:
- Download Microsoft Visual C++ 2019 Redistributable Runtime.
- Download the binaries from MySQL.
- The archive is typically named
mysql-x.x.x-winx64.zip, where ‘x.x.x‘ represents the version number. For example,mysql-8.0.35-winx64.zipis the latest version at the time of writing this. - Official download URL (for community version):
https://dev.mysql.com/downloads/mysql/ - Extract the zip archive into a folder and that will be the root folder for running the MySQL server.
- Create an option file (my.ini) at the root folder.
- Initialize the “Data” directory
- Install Windows Service for the MySQL Server
- Start / Stop the Service of MySQL Server
- Set / Change the password for “root” user.
Let’s Start
MySQL Server for Windows require Microsoft Visual C++ 2019 Runtime. You may download the “Visual C++ Redistributable for Visual Studio 2015-2022” at the following link:
https://learn.microsoft.com/en-us/cpp/windows/latest-supported-vc-redist?view=msvc-170
Assume that you extract the zip archive to the following folder (It can be any location):
C:\mysqlThe root folder will have the following extracted content:
C:\mysql\bin\
C:\mysql\docs\
C:\mysql\include\
C:\mysql\lib\
C:\mysql\share\
C:\mysql\LICENSE
C:\mysql\README
Create an option file in the root folder and name it my.ini. However, creating an option file is not required if you plan to use all the default parameters.
Location of the option file:
// default location
<root folder>\my.ini

// example
C:\mysql\my.ini
You can find documentation on the default location and details of an option file here:
- MySQL 8.0 Reference Manual :: 4.2.2.2 Using Option Files
- https://dev.mysql.com/doc/refman/8.0/en/server-option-variable-reference.html
- https://dev.mysql.com/doc/refman/8.0/en/server-system-variables.html
An option file fine-tunes the behavior of a MySQL server, such as altering its memory access limit, performance, and the various ways it handles specific actions. .
Below is an example of the option file that I used in one of the MySQL server:
[mysqld]
max_allowed_packet=1G
innodb_buffer_pool_size=500M
sql-mode="STRICT_TRANS_TABLES"
authentication_policy=mysql_native_password
Options that are not specified in the option file will apply default values. Some of the notable default options:
[client]
port=3306

[mysqld]
# the root folder: <root>
basedir=C:/mysql
or
basedir=C:\\mysql

# the data folder: <root>/data
datadir=C:/mysql/data
or
datadir=C:\\mysql\\data

port=3306

# Default Characters Encoding
# defaults in MySQL 8
character_ser_server=utf8mb4
collation_server=utf8mb4_0900_ai_ci

# defaults in MySQL 5.7 and below
character_ser_server=latin1
collation_server=latin1_swedish_ci

# https://dev.mysql.com/doc/refman/8.0/en/innodb-storage-engine.html
# https://dev.mysql.com/doc/refman/8.0/en/storage-engines.html
default_storage_engine=InnoDB

# https://dev.mysql.com/doc/refman/8.0/en/innodb-parameters.html#sysvar_innodb_buffer_pool_size
# default: 130 MB
# for caching InnoDB tables and index data in memory to improve performance
innodb_buffer_pool_size=134217728

# maximum length of single query
# default: 64 MB
max_allowed_packet=67108864

# define what SQL syntax MySQL should support and
# what kind of data validation checks it should perform
# https://dev.mysql.com/doc/refman/8.0/en/sql-mode.html
sql-mode="ONLY_FULL_GROUP_BY,
          STRICT_TRANS_TABLES,
          NO_ZERO_IN_DATE,
          NO_ZERO_DATE,
          ERROR_FOR_DIVISION_BY_ZERO,
          NO_ENGINE_SUBSTITUTION"

# using MySQL legacy user password that is backward compatible with older version of MySQL 5
authentication_policy=mysql_native_password

# this is the default in MySQL 8, which provides stronger security
authentication_policy=caching_sha2_password
Here I would like to take some time to add some explanation for the default values for “sql-mode“.
ONLY_FULL_GROUP_BY - when enabled
=================================
-- this will cause error
select id, groupid, groupname from sales group by groupid;

-- the group by clause must include the rest of columns
select id, groupid, groupname from sales group by groupid, id, groupname;


STRICT_TRANS_TABLES - when enabled
=================================
-- strictly adhere to the data types and values defined in the table schema,
-- any incorrect data input results in an error

-- example:

CREATE TABLE test (
    id INT NOT NULL AUTO_INCREMENT,
    total INT NOT NULL,
    PRIMARY KEY (id)
);

-- This will cause an error, `total` does not allow null value
INSERT INTO test (total) VALUES (NULL);


NO_ZERO_IN_DATE, NO_ZERO_DATE - when enabled
=================================
-- the following zero date values are not allowed:

0000-00-00
0000-00-00 00:00:00
2023-00-00


ERROR_FOR_DIVISION_BY_ZERO
=================================
-- cannot divide anything with zero

- when enabled
1000 / 0 = error

- when disable
1000 / 0 = null


NO_ENGINE_SUBSTITUTION
=================================
-- prevents the database from automatically replacing an unavailable
-- storage engine with the default engine, ensuring that tables are
-- only created with the specified engine.

- when enabled

CREATE TABLE example_table (
    id INT,
    data VARCHAR(100)
) ENGINE=MERGE;
 -- This will fail if MERGE engine is not available.

- when disable
-- the ENGINE=MERGE will become Innodb
Let’s assume that we have another instance of MySQL that needs to run in a specific, out-of-the-ordinary manner. The option file might look something like this:
[client]
port = 4001

[mysqld]
port = 4001
basedir = D:/database/engine/mysql/v8.0.25/
datadir = E:/database/data/mysql/4001/
max_allowed_packet = 1G
innodb_buffer_pool_size = 1G

# Run this instance of MySQL as replication
# Special options for replication setup
server-id = 2
master-host = 192.168.0.254
master-user = replication_user
master-password = replication_password
master-port = 3306
read-only = 1
If you are wondering what is a replication setup in MySQL context? A replication setup in MySQL is a configuration where data from one MySQL server (the master) is automatically copied and kept up-to-date on another server (the replica, or the slave).
*Side note for replication setup: A dedicated user needs to be created on the “Master” MySQL server. Here’s a quick example of the SQL statements to create the user:
-- create the user
CREATE USER 'replica_user'@'%' IDENTIFIED BY 'replica_password';

-- grant the permission for performing replication tasks
GRANT REPLICATION SLAVE ON *.* TO 'replica_user'@'%';

-- ensure the changes take effect
FLUSH PRIVILEGES;
Next Step: Initialize “Data” Directory
Run “CMD” (or Command Prompt) as administrator.
Go to the BIN directory and run one of the following command. In command prompt, it will look something like this:
[CMD]

// go to the drive
C:

// go to the directory of BIN
CD C:\mysql\bin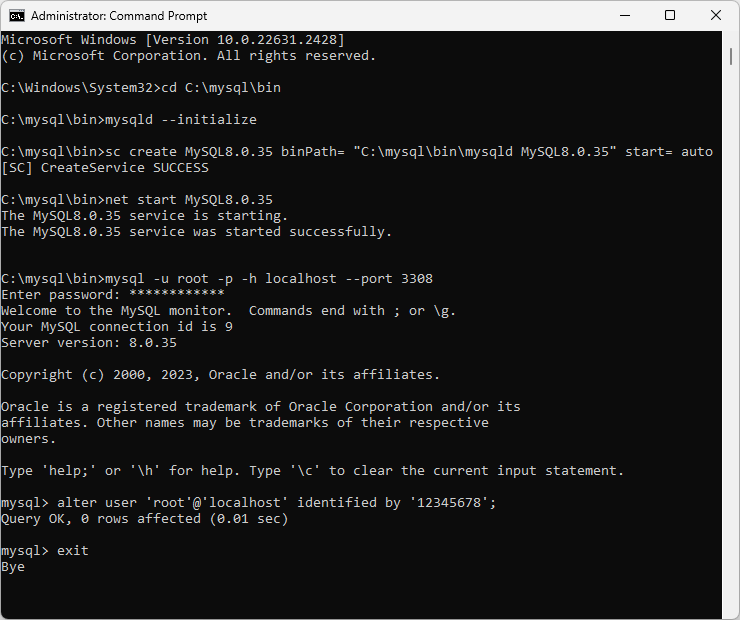
Initialize the “data” directory with the following command:
[CMD]

// Method 1:
// assign blank password for root user
mysqld --initialize-insecure


// Method 2:
// assign random password for root user, obtain the password at the error log file
mysqld --initialize


// Manually define the location of option file if it is not located at the default path

mysqld --initialize-insecure --defaults-file=C:\other\folder\my.ini

mysqld --initialize --defaults-file=C:\other\folder\my.ini
As mentioned earlier, default location of option file is relative to mysqld.exe.
// location of mysqld.exe:

<path>/bin/mysqld.exe

// the option file is expected to be located at:

<path>/my.ini

Example of the path of mysqld.exe:

C:\database\mysql\v8.0.35\bin\mysqld.exe

Default expected path for option file:

C:\database\mysql\v8.0.35\my.ini
This will create a data directory at the <root>. Example:
C:\database\mysql\v8.0.35\data

// According to the example provided is previous block of code
If you initialize the “data” directory by using “mysqld --initialize” command, you can obtain the password at the error log file, which is the name of the log file: <computer name>.err. By following above example, it will be something like
C:\database\mysql\v8.0.35\data\mypcname.errIf anything goes wrong, you can find hints about the cause of the errors in the error log file. If the initialization succeeds, the error log file will look something like this:
(Assume that you run the initialization with: mysqld --initialize)
2023-11-17T13:12:22.493220Z 1 [System] [MY-013576] [InnoDB]
InnoDB initialization has started.

2023-11-17T13:12:23.244460Z 1 [System] [MY-013577] [InnoDB]
InnoDB initialization has ended.

2023-11-17T13:12:25.271888Z 6 [Note] [MY-010454] [Server]
A temporary password is generated for root@localhost: cQ<l/vxC0;P!
Start MySQL server manually (without using Windows Service):
// when option file is located at default location

mysqld

or

// when option file is located somewhere else

mysqld --defaults-file=C:\dbconfig\my\heavy-ram.ini
Manually stop MySQL server (without using Windows Service):
[CMD]

mysqladmin -u root -p -h localhost --port 3306 shutdown
Install Windows Service for the MySQL Server
There are 2 ways to install Windows Service to run MySQL server.
(Install Service) Method 1: Using Windows CMD “sc” command.
Note: The service will run under “LocalSystem” privilege, which is good for MySQL server.
Basic Syntax:
[CMD]

sc create <service_name> binPath= "<path_of_mysqld> <path_option_file> <service_name>"
start= <boot|system|auto|demand|disabled|delayed-auto>
Examples:
[CMD]

Example 1:

sc create MySQL8.0.35 binPath= "C:\mysql\bin\mysqld.exe MySQL8.0.35" start= auto

Example 2:

sc create MySQL8 binPath= "C:\mysql\bin\mysqld.exe MySQL8" start= auto

Example 3:

sc create "MySQL 8" binPath= "C:\mysql\bin\mysqld.exe \"MySQL 8\"" start= auto
Include the path for option file (my.ini) in binPath.
[CMD]

// execute in single line

Example 1:

sc create MySQL8 binPath= "C:\mysql\bin\mysqld
--defaults-file=C:\mysql\my.ini MySQL8" start= auto

Example 2:

sc create "MySQL 8" binPath= "\"C:\mysql 8\bin\mysqld\"
--defaults-file=\"C:\mysql 8\my.ini\" \"MySQL 8\"" start= auto
Note: The following syntax is incorrect:
[CMD]

// incorrect demonstration:

// there must be a space after the equal sign '='.

sc create "MySQL8" binPath="C:\mysql\bin\mysqld.exe MySQL8" start=auto

// the service name must be included at the end of binPath

sc create "MySQL8" binPath= "C:\mysql\bin\mysqld.exe" start= auto

// the service name with empty space is not wrapped with double quote in binPath

sc create "MySQL 8" binPath= "C:\mysql\bin\mysqld.exe MySQL 8" start= auto
If the option file is not located in their default locations, you can manually specify the path as argument (or parameter) along with the binPath. Here’s an example:
// execute the following in single line

sc create MySQL8
binPath= "\"C:\mysql\bin\mysqld.exe\"
--defaults-file=\"C:\dbconfig\my-heavy-ram.ini\" MySQL8"
start= auto
Manually start the service for the first time:
[CMD]

net start MySQL8.0.35

or

net start MySQL8

or

net start "MySQL 8"
To stop the service:
[CMD]

net stop MySQL8.0.35

or

net stop MySQL8

or

net stop "MySQL 8"
To delete the service:
[CMD]

sc delete MySQL8.0.35

or

sc delete MySQL8

or

sc delete "MySQL 8"
To edit the service:
[CMD]

// to change the binPath

sc config MySQL8 binPath= "C:\db-engine\mysql\v8\bin\mysqld MySQL8"

// to change the start type

sc config "MySQL 8" start= auto
(Install Service) Method 2: Using MySQL built-in mysqld install function:
[CMD]

// install the service
mysqld --install "MySQL8"

// specify the path for option file
mysqld --install "MySQL8" --defaults-file="C:\mysql\my.ini"
Change the start mode of the service from “demand/manual” to “auto”, then start the service:
// change the start mode from "manual" to "auto"
sc config "MySQL8" start= auto

// manually start the service for the first time
net start "MySQL8"

// stop the service
net stop "MySQL8"
Set / Change the password for “root” user.
In the CMD, still at the “BIN” folder, use the program “mysql” to enter the server:
[CMD]

// using default port 3306
mysql -u root -p -h localhost


// if server run under different port, such as 4001
mysql -u root -p -h localhost --port 4001- –
u: username -p: prompt for password-h: server host location--port: port number of the MySQL server
Next, MySQL will prompt for a password. If you initialize the data with mysqld --initialize-insecure, the password is blank. For initialization with mysqld --initialize, a temporary root password is generated, go to the error log file to look for the password.
To set or change the password:
[CMD/MySQL]

alter user 'root'@'localhost' identified by 'your password here';
Done. The MySQL server is now ready for use. Happy databasing.