Source Code (Github): https://github.com/adriancs2/arduino.aes.asp.net
This article is also posted at CodeProject.com:
https://www.codeproject.com/Articles/5365769/AES-Encrypted-Data-Transmission-Between-Arduino-ES
Communication between Arduino and C# (ASP.NET) by using AES encrypted HTTP GET request
This article will discuss the implementation of an AES-encrypted HTTP GET request carried between an Arduino (ESP32) device and C# ASP.NET.
Both Arduino and C# have AES encryption libraries available for use. Therefore, messages can be encrypted during data transmission between them.
I had experienced with AES encryption in the pass, I wrote an article about the AES 256 bit implementation in C#. Below is the link to that article.
https://adriancs.com/c-sharp/216/c-aes-256-bits-encryption-library-with-salt/
But however, this is the first time that I use AES in Arduino project. If my understanding is correct, the basic foundation of the AES algorithm is implemented the same way in both programming languages (C/C++ and C#). So, there should have no problem to encrypt it on C/C++ and decrypt it in C#, and vice versa encrypt in C# and decrypt in C/C++.
Okay, let’s start.
There are 5 elements (parameters) that will affect how AES works. Let’s identify them:
- Cipher Mode
- Block/Key size (128 bits, 192 bits, 256 bits)
- Key bytes
- IV bytes (Initial Vector)
- Padding Mode
By setting correctly in both side (C# and C/C++), they should produce the same result.
First, Cipher Mode:
decompiling the C# Assemblies, the following is obtained:
namespace System.Security.Cryptography
{
    [Serializable]
    [ComVisible(true)]
    public enum CipherMode
    {
        CBC = 1,
        ECB,
        OFB,
        CFB,
        CTS
    }
}
CBC is the default Cipher Mode used in C# AES.
Okay, let’s explore the AES Cipher Mode in Arduino.
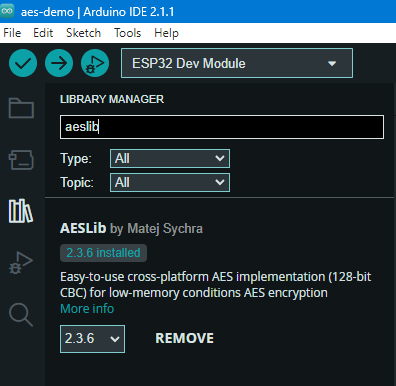
After some searching, I found and installed a library called “AESLib” provided by Matej Sychra.
Arduino Reference Page: https://www.arduino.cc/reference/en/libraries/aeslib/
Author’s Github: https://github.com/suculent/thinx-aes-lib
The key/block size and Cipher Mode
According to description, it uses key size of 128 bits and CBC Cipher Mode.
The KEY and IV
Since ‘AESLib‘ uses a 128-bit key size, this means the ‘Key‘ and ‘IV‘ will consist of 16 bytes. 16 bytes equals 128 bits. Each byte can represent any number ranging from 0 to 255.
Random 16 bytes, Okay, this is easy. Example:
C# (ASP.NET):
byte[] aesKey = { 48, 85, 92, 36, 73, 111, 127, 18, 64, 38, 54, 89, 72, 105, 78, 15 };
byte[] aesIv = { 145, 33, 51, 67, 24, 173, 52, 209, 63, 42, 13, 115, 220, 3, 8, 10 };
C/C++ (Arduino):
byte aesKey[] = { 48, 85, 92, 36, 73, 111, 127, 18, 64, 38, 54, 89, 72, 105, 78, 15 };
byte aesIv[] = { 145, 33, 51, 67, 24, 173, 52, 209, 63, 42, 13, 115, 220, 3, 8, 10 };
What are the ‘KEY‘ and ‘IV‘ doing?
- The ‘KEY‘: It’s the secret password used to scramble (encrypt) and unscramble (decrypt) your data.
- The Initial Vector (IV): This is typically a random number used to ensure that the same data doesn’t look the same when encrypted twice. However, we’ll be hard-coding the IV in our case, so the same data will look identical each time it’s encrypted.
During the encryption process, the original bytes (or text) will be separated into multiple blocks. Both the ‘KEY‘ and ‘IV‘ influence the outcome of the scrambling of each block.
When decrypting (reversing/unscrambling) the blocks, the same ‘KEY‘ and ‘IV‘ must be used to reveal the original context, or else you’ll get a jumble of alien language!
After a block is completely scrambled, a new ‘IV‘ will be generated for influencing the scrambling of the next block by following a specific pattern from the previous data block. The same ‘KEY‘ will always be used for each block.
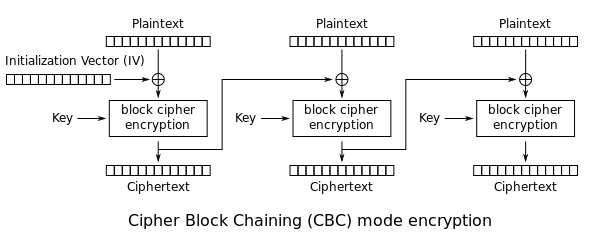
Image Source: https://en.wikipedia.org/wiki/Block_cipher_mode_of_operation
The ‘KEY‘, often referred to as the ‘Password‘, is typically provided by the end user (whoever is using the software). No one, including you (the developer), will know what the ‘KEY‘ data is that can reverse the scrambling. (That is, unless you save the user’s ‘Password’ in the database).
As for the ‘IV‘, it’s usually hard-coded within the software. Only you (the developer) will know what the ‘IV‘ data is. (Unless, of course, the source code is leaked or someone reverse-engineers or decompiles the software binary code).
Let’s use this analogy: The ‘KEY‘ is like the first password (public), and the ‘IV‘ is the second password (private).
However, in this Arduino project, both ‘passwords’ (KEY and IV) will be hard-coded and kept private.
Padding Mode
The final element that we’ll be examining is the ‘Padding Mode‘.
In C#, the available padding modes are as follows:
namespace System.Security.Cryptography
{
    [Serializable]
    [ComVisible(true)]
    public enum PaddingMode
    {
        None = 1,
        PKCS7,
        Zeros,
        ANSIX923,
        ISO10126
    }
}
PKCS7 is the default padding mode used by C#’s AES.
However, in the Arduino ‘AESLib‘, upon exploring the source code provided by the author (found here: https://github.com/suculent/thinx-aes-lib/blob/master/src/AES.h), the available padding modes are listed as follows (see line 41):
enum class paddingMode {
CMS,
Bit,
ZeroLength,
Null,
Space,
Random,
Array
};
Interestingly, these don’t seem to directly match what’s available in C#
Then, I continued to explore another C++ source file: https://github.com/suculent/thinx-aes-lib/blob/master/src/AES.cpp
at line 442:
...

* CMS (Cryptographic Message Syntax).
*     This pads with the same value as the number of padding bytes.
*     Defined in RFC 5652, PKCS#5, PKCS#7 (X.509 certificate) and RFC 1423 PEM.

...
The keyword “PKCS#7” is mentioned in the description of the CMS padding mode, which aligns with the PKCS7 padding mode in C#. Therefore, we’ll select the CMS padding mode for implementation in Arduino C/C++.
Till here, all parameters are identified.
- Cipher Mode: CBC
- Block/Key size: 128 bits
- Key: 16 bytes
- IV: 16 bytes
- Padding Mode: PKCS7 in C#, CMS in Arduino C/C++
Let’s begin the coding.
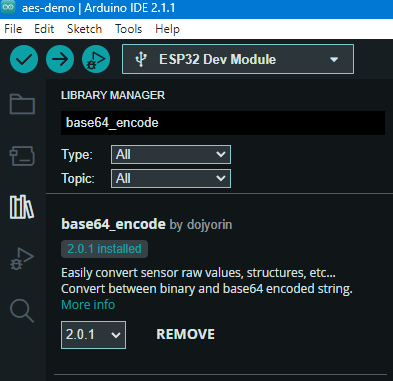
I used a library called “base64_encode” provided by dojyorin, to perform base64 encoding.
- Arduino Reference Page: https://www.arduino.cc/reference/en/libraries/base64_encode/
- Arthor’s Github: https://github.com/dojyorin/arduino_base64
(What is base64 encoding? https://www.youtube.com/watch?v=8qkxeZmKmOY)
Let’s start from the encryption in Arduino C/C++. Code explanation is provided in the comments within the lines of code:
// import AES encryption library
#include "AESLib.h"

// import base64 conversion library
#include "arduino_base64.hpp"

// declare a global AESLib object
AESLib aesLib;

// the text encryption function
String encrypt(String inputText) {

    // calculate the length of bytes of the input text
    // an extra of byte must be added for a null character
    // a null character will be filled as a text terminator
    // so that the process will not overflow to other parts of memory
    int bytesInputLength = inputText.length() + 1;

    // declare an empty byte array (a memory storage)
    byte bytesInput[bytesInputLength];

    // convert the text into bytes, a null char is filled at the end
    inputText.getBytes(bytesInput, bytesInputLength);

    // calculate the length of bytes after encryption done
    int outputLength = aesLib.get_cipher_length(bytesInputLength);

    // declare an empty byte array (a memory storage)
    byte bytesEncrypted[outputLength];

    // initializing AES engine

    // Cipher Mode and Key Size are preset in AESLib
    // Cipher Mode = CBC
    // Key Size = 128

    // declare the KEY and IV
    byte aesKey[] = { 23, 45, 56, 67, 67, 87, 98, 12, 32, 34, 45, 56, 67, 87, 65, 5 };
    byte aesIv[] = { 123, 43, 46, 89, 29, 187, 58, 213, 78, 50, 19, 106, 205, 1, 5, 7 };

    // set the padding mode to paddingMode.CMS
    aesLib.set_paddingmode((paddingMode)0);

    // encrypt the bytes in "bytesInput" and store the output at "bytesEncrypted"
    // param 1 = the source bytes to be encrypted
    // param 2 = the length of source bytes
    // param 3 = the destination of encrypted bytes that will be saved
    // param 4 = KEY
    // param 5 = the length of KEY bytes (16)
    // param 6 = IV
    aesLib.encrypt(bytesInput, bytesInputLength, bytesEncrypted, aesKey, 16, aesIv);

    // declare a empty char array
    char base64EncodedOutput[base64::encodeLength(outputLength)];

    // convert the encrypted bytes into base64 string "base64EncodedOutput"
    base64::encode(bytesEncrypted, outputLength, base64EncodedOutput);

    // convert the encoded base64 char array into string
    return String(base64EncodedOutput);
}
The C# version of encryption:
using System.Security.Cryptography;

static byte[] aesKey = { 23, 45, 56, 67, 67, 87, 98, 12, 32, 34, 45, 56, 67, 87, 65, 5 };
static byte[] aesIv = { 123, 43, 46, 89, 29, 187, 58, 213, 78, 50, 19, 106, 205, 1, 5, 7 };

public static string AesEncrypt(string originalText)
{
    // add a null character at the end
    // this is required by Arduino C/C++ as a string terminator
    // prevent Arduino process to overflow to other memory's data
    originalText += "\0";

    // convert the string into bytes (byte array)
    byte[] data = System.Text.Encoding.UTF8.GetBytes(originalText);

    // initialize AES encryption
    using (Aes aes = Aes.Create())
    {
        // set the AES parameters
        aes.KeySize = 128;
        aes.BlockSize = 128;
        aes.Mode = CipherMode.CBC;
        aes.Padding = PaddingMode.PKCS7;
        aes.Key = aesKey;
        aes.IV = aesIv;

        // Create an encryptor to encrypt the data
        ICryptoTransform encryptor = aes.CreateEncryptor(aes.Key, aes.IV);

        // create a memory stream for AES to store the encrypted bytes
        using (MemoryStream msEncrypt = new MemoryStream())
        {
            using (CryptoStream csEncrypt = new CryptoStream(msEncrypt, encryptor, CryptoStreamMode.Write))
            {
                // begin the encryption process
                csEncrypt.Write(data, 0, data.Length);
                csEncrypt.FlushFinalBlock();

                // get the encrypted bytes
                data = msEncrypt.ToArray();
            }
        }
    }

    // convert the encrypted bytes into base64 string
    // sending this text to Arduino
    return Convert.ToBase64String(data);
}
Next, the decryption, first, the Arduino version:
// the decryption function
String decrypt(String encryptedBase64Text) {

    // calculate the original length before it was coded into base64 string
    int originalBytesLength = base64::decodeLength(encryptedBase64Text.c_str());

    // declare empty byte array (a memory storage)
    byte encryptedBytes[originalBytesLength];
    byte decryptedBytes[originalBytesLength];

    // convert the base64 string into original bytes
    // which is the encryptedBytes
    base64::decode(encryptedBase64Text.c_str(), encryptedBytes);

    // initializing AES engine

    // Cipher Mode and Key Size are preset in AESLib
    // Cipher Mode = CBC
    // Key Size = 128

    // declare the KEY and IV
    byte aesKey[] = { 23, 45, 56, 67, 67, 87, 98, 12, 32, 34, 45, 56, 67, 87, 65, 5 };
    byte aesIv[] = { 123, 43, 46, 89, 29, 187, 58, 213, 78, 50, 19, 106, 205, 1, 5, 7 };

    // set the padding mode to paddingMode.CMS
    aesLib.set_paddingmode((paddingMode)0);

    // decrypt bytes in "encryptedBytes" and save the output in "decryptedBytes"
    // param 1 = the source bytes to be decrypted
    // param 2 = the length of source bytes
    // param 3 = the destination of decrypted bytes that will be saved
    // param 4 = KEY
    // param 5 = the length of KEY bytes (16)
    // param 6 = IV
    aesLib.decrypt(encryptedBytes, originalBytesLength, decryptedBytes, aesKey, 16, aesIv);

    // convert the decrypted bytes into original string
    String decryptedText = String((char*)decryptedBytes);

    return decryptedText;
}
The C# version of decryption:
public static string AesDecrypt(string base64str)
{
    byte[] data = null;

    // the base64 string into bytes that's encrypted at Arduino
    byte[] encryptedData = Convert.FromBase64String(base64str);

    // initialize AES encryption
    using (Aes aes = Aes.Create())
    {
        // set the AES parameters
        aes.KeySize = 128;
        aes.BlockSize = 128;
        aes.Mode = CipherMode.CBC;
        aes.Padding = PaddingMode.PKCS7;
        aes.Key = aesKey;
        aes.IV = aesIv;

        // Create a decryptor to decrypt the data
        ICryptoTransform decryptor = aes.CreateDecryptor(aes.Key, aes.IV);

        // initialize memory stream to read data from the encrypted bytes
        using (MemoryStream msDecrypt = new MemoryStream(encryptedData))
        {
            // initialize the AES decryption engine
            using (CryptoStream csDecrypt = new CryptoStream(msDecrypt, decryptor, CryptoStreamMode.Read))
            {
                // declare a memory stream for AES to save the decrypted data
                using (MemoryStream originalMemoryStream = new MemoryStream())
                {
                    byte[] buffer = new byte[1024];
                    int readBytes;
                    while ((readBytes = csDecrypt.Read(buffer, 0, buffer.Length)) > 0)
                    {
                        originalMemoryStream.Write(buffer, 0, readBytes);
                    }

                    // extract the decrypted data from the memory stream
                    data = originalMemoryStream.ToArray();
                }
            }
        }
    }

    // Convert the bytes into string
    string text = System.Text.Encoding.UTF8.GetString(data);

    // remove the last null character (added by Arduino as line terminator)
    text = text.Remove(text.Length - 1, 1);

    return text;
}
Building the Application
First, the ASP.NET Website
Now, let’s build the ASP.NET WebForms Application for handling the request sent from Arduino.
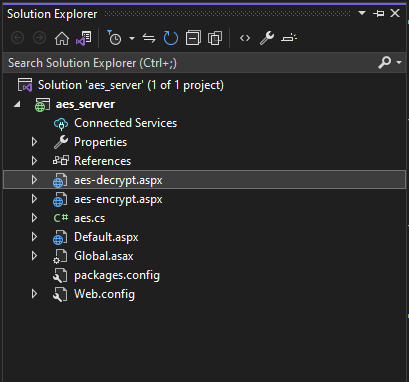
In the ASP.NET solution explorer, add 2 pages:
- aes-decrypt.aspx
- aes-encrypt.aspx
(You can name it anything)
If you would like to, you can route the page. By adding a Global.asax into your project and route the pages like this:
protected void Application_Start(object sender, EventArgs e)
{
    RouteTable.Routes.MapPageRoute("aes-encrypt", "aes-encrypt", "~/aes-encrypt.aspx");
    RouteTable.Routes.MapPageRoute("aes-decrypt", "aes-decrypt", "~/aes-decrypt.aspx");
}
and therefore, these pages can be accessed like this:
http://192.168.1.100:8080/aes-encrypt
http://192.168.1.100:8080/aes-decrypt
I’ve written another article explaining routing in ASP.NET WebForms. Feel free to check it out at this link:
https://adriancs.com/aspnet-webforms/419/automatic-route-all-pages-in-asp-net-webforms/
The port 8080 shown above is a custom port I used in my demo project, and this site is run by the Windows IIS Web Server. Since the page only processes HTTP GET requests, you can easily migrate the code to ASP.NET Core, which can also be hosted on Linux.
When you open the front end of both pages (aes-encrypt.aspx and aes-decrypt.aspx), you’ll find the following code:
<%@ Page Language="C#" AutoEventWireup="true" CodeBehind="WebForm1.aspx.cs" Inherits="System.WebForm1" %>

<!DOCTYPE html>

<html xmlns="http://www.w3.org/1999/xhtml">
<head runat="server">
    <title></title>
</head>
<body>
    <form id="form1" runat="server">
        <div>
        </div>
    </form>
</body>
</html>
Delete everything, except for the 1st line:
<%@ Page Language="C#" AutoEventWireup="true" CodeBehind="WebForm1.aspx.cs"
   Inherits="System.WebForm1" %>
Now, edit the code behind for the page “aes-encrypt.aspx“. This will simulate the action of sending encrypted message to Arduino.
protected void Page_Load(object sender, EventArgs e)
{
    try
    {
        // this page will be initiated by GET request from Arduino

        string originalText = "mirror mirror on the wall who is the fairest of them all";

        string base64str = aes.AesEncrypt(originalText);

        // send out the encrypted string to Arduino
        Response.Write(base64str);
    }
    catch(Exception ex)
    {
        Response.Write("Error: " + ex.Message);
    }
}
Next, edit another page “aes-decrypt.aspx“. This will simulate the action of receiving encrypted data sent by Arduino:
protected void Page_Load(object sender, EventArgs e)
{
    try
    {
        // obtaining the GET request, the data appended after the symbol "?"
        // which is also called Query String
        string base64str = Request.Url.Query;

        // remove the 1st character "?"
        base64str = base64str.Remove(0, 1);

        // decode the URL characters of "%2B", "%2F", "%3D" into "+", "/", "="
        base64str = Server.UrlDecode(base64str);

        string text = aes.AesDecrypt(base64str);

        // send out the decrypted text to Arduino
        Response.Write(text);
    }
    catch (Exception ex)
    {
        Response.Write("Error: " + ex.Message);
    }
}
Done for the web server side.
Writing the Code for Arduino
Next, move on to the coding for Arduino. Here, I’m using the ESP32 module, which has WiFi built-in.
// Provide HTTP Get request features
#include <WiFi.h>
#include <HTTPClient.h>

// The AES Encryption Library
#include "AESLib.h"
#include "arduino_base64.hpp"

// declare a global AESLib object
AESLib aesLib;

void setup() {

}
Inside the function of setup(), continues the following:
Connecting WiFi
// begin the bit per second communication speed
// between Arduino and computer for serial port monitoring
Serial.begin(115200);

String encryptedText = "";
String decryptedText = "";
String url = "";

String wifi_ssid = "your_ssid";
String wifi_password = "your_ssid_pwd";

// begin connecting WiFi
WiFi.begin(wifi_ssid, wifi_password);

// check for WiFi connectivity status
while (WiFi.status() != WL_CONNECTED) {

    Serial.println("Connecting WiFi...");

    // wait for 1 second before re-checking WiFi status
    delay(1000);
}

Serial.println("WiFi connected!");
Test 1: Local arduino encrypt and decrypt
Serial.println();
Serial.println("** Round 1: Local Test - Arduino Encrypt >> Arduino Decrypt");
Serial.println();

String text1 = "Luke, I am your father";
String text2 = encrypt(text1);
String text3 = decrypt(text2);

// send the output to the computer for monitoring & debugging
Serial.println("Original text: \"" + text1 + "\"");
Serial.println("Encrypted text: \"" + text2 + "\"");
Serial.println("Decrypted text: \"" + text3 + "\"");
Test 2: HTTP Get Request – Arduino Encrypt >> C# Decrypt
Serial.println();
Serial.println("** Round 2: HTTP Get Request - Arduino Encrypt >> C# Decrypt");
Serial.println();

String originalText = "What if I told you everything you know to be true is wrong";

Serial.println("Original Text: \"" + originalText + "\"");
Serial.println("Begin arduino encryption process...");

encryptedText = encrypt(originalText);

Serial.println("Arduino encrypted text: \"" + encryptedText + "\"");

Serial.println("Sending encrypted text to server...");

// declare a http client
HTTPClient http;

// test server decryption

// encode the query data for URL
encryptedText.replace("+", "%2B");
encryptedText.replace("/", "%2F");
encryptedText.replace("=", "%3D");

// send the encrypted data to the ASP.NET Web Server
url = "http://192.168.1.100:8080/aes-decrypt?" + encryptedText;
Serial.println("URL: " + url);

http.begin(url);

// send a HTTP GET request
int httpResponseCode = http.GET();

// the ASP.NET web server received and responded to the message
if (httpResponseCode > 0) {
    Serial.print("HTTP success: ");
    Serial.println(httpResponseCode);

    decryptedText = http.getString();
    Serial.println("Returned server decrypted Text: \"" + decryptedText + "\"");

} else {
    Serial.print("Error occurred while sending HTTP request. Error code: ");
    Serial.println(httpResponseCode);
}

http.end();
Test 3: HTTP Get Request – C# Encrypt >> Arduino Decrypt
Serial.println();
Serial.println("** Round 3: HTTP Get Request - C# Encrypt >> Arduino Decrypt");
Serial.println();

Serial.println("Downloading encrypted text from server...");

// get encrypted data from ASP.NET Web Server
url = "http://192.168.1.100:8080/aes-encrypt";
Serial.println("URL: " + url);

http.begin(url);

httpResponseCode = http.GET();

bool round2DownloadSuccess = false;

// encrypted data downloaded successfully
if (httpResponseCode > 0) {

    Serial.print("HTTP success: ");
    Serial.println(httpResponseCode);

    round2DownloadSuccess = true;

    encryptedText = http.getString();
    Serial.println("Received server encrypted text: \"" + encryptedText + "\"");

} else {
    Serial.print("Error occurred while sending HTTP request. Error code: ");
    Serial.println(httpResponseCode);
}

http.end();  // Close connection

if (round2DownloadSuccess) {
    Serial.println("Begin arduino decrypting process...");
    decryptedText = decrypt(encryptedText);
    Serial.println("Arduino decrypted Text: \"" + decryptedText + "\"");
}
Done.
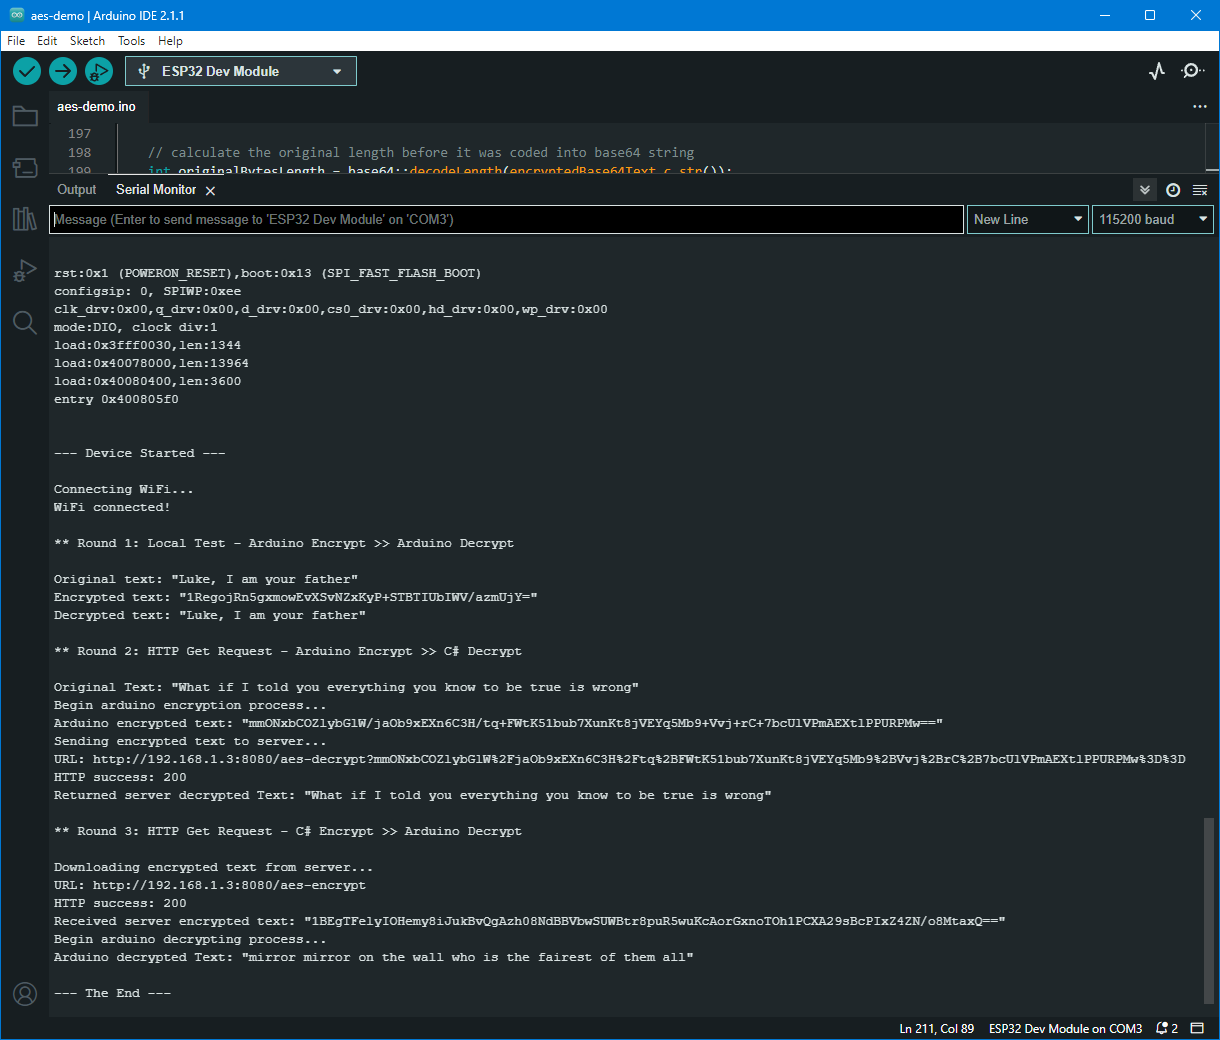
If you’ve successfully built and set up the ASP.NET Web Server, and you run the Arduino code, you should see an output that looks something like this:
Thanks for reading. Happy coding!
(Click on the image to enlarge)